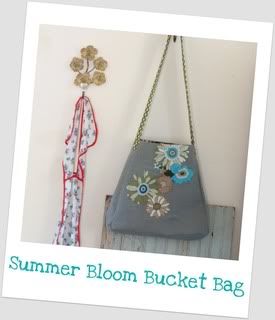
(Click on picture to find out how to make it)
What you will need:
- Heat Bond or any other brand of iron on stabilizer
- Fabric with design you want to cut out
- Embroidery floss in matching colors
- Crewel or Embroidery needle
- Iron
- Scissors
- Iron your fabric smooth - no wrinkles at all on either side.
- Cut out enough of the Heat Bond to cover the design on the fabric you want to cut out. Iron this onto the wrong side of the fabric design - leaving the paper side of the Heat Bond on.
- Once stabilizer is attached to the fabric and cool enough to handle, get out your scissors and carefully cut out the design.
- Carefully pull off paper backing of the Heat Bond and position the design where you would like it to lay. Remember to keep in mind the seam allowances.
- Once positioned where you want it press with a hot iron - starting in the middle of the design working out. This prevents fabric wrinkles and air bubbles. I also like to flip over the fabric and press from the back as well.
- Now your design should be secure enough onto your fabric to embroider. You can get as fancy as you want stringing beads, buttons, sequins, or other objects to embellish the design. I kept mine simple and embroidered around the petals of the flowers. Remember to secure the edges of the applique all the way around the design. This helps keep the design to the fabric and from fraying, even if it needs to be washed.
This bag would also make a great sleepover bag for the kids - you could even applique their name on it with the same method as above. Just print out large font that you like, cut out the letters, and then use the letters as a stencil onto the heat bond paper (just remember to flip the letters before you trace them or when you cut them out they will be backwards).
The possibilities with the bag are endless and that's why I wanted to keep just the structure of the bag in the tutorial. If you do make a bag please share it on the Itchin' Stitchin' Flickr Group. I would love to see how everyone else's bags come out.
If you are wondering what I will be doing with the lovely bag in the tutorial pictures or maybe about that floral fabric... well keep your eyes peeled on my blog, you might just see them in an upcoming giveaway .. right here!!!


Beautiful bag, thank you for the tutorial.
ReplyDeleteCarol xx
Gorgeous bag and so good of you to share the tutorial!
ReplyDeleteVivienne x
Oh! I love the shape! Now if only I could sew. ~Val
ReplyDeleteAmanada- Bravo! That bag is a stunner!
ReplyDeleteI so desperately need to get my sewing area organized- I would love to try my hand at this bag! :)