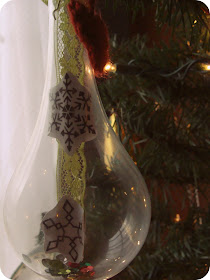
Guess when you fill your life with happy things like making ornaments for Micaela's ornament swap - it spills over. Putting some lovely paper snowflakes on vintage lace, filling it with pretty red, green, and silver sequins, in a glass ornaments makes a beautiful display on your Christmas tree. Hopefully my ornament swap partner feels the same way.
Also can't forget the small crochet red heart that is attached at the top. Some love and warm wishes to bring in the season with. I had to thank the lovely hostess of this swap. So with my crafty hat on I decided to make Micaela an ornament just for her.
Sharing special moments and memories is a special part of the holiday season. When I saw a picture of her wedding kiss on her blog I knew it was just the memory you always want to remember. Here is how I made her ornament:
Materials ~
- Spray glue
- Clear glass ornament
- Digital photo printed on photo paper
- Twine, string, or vintage lace piece
- Sequins
- Print out your photo twice making sure one of the photos is flipped horizontally so that when matched back to back the shapes match. Also note the size of your ornament and size of photo - make sure to print it small enough to fill the inside of the ornament.
- With the pictures back to back cut out the photos. Place one photo face down on a surface that can get messy with spray glue. Spray the back of your photo and place your string or lace in the middle, leaving a long tail going to the top of the photo. Place the other photo's back on top - making a photo sandwich. Let spray glue dry.
- Fill your ornament with different color sequins.
- Once photo is dry, roll your photo like a tube so you can fit it the opening of the ornament. Carefully take the metal top of the ornament fit the photo through the glass opening.and hold the string or lace so that it's still coming out the top of ornament. With a pen or long thin object push your photo against the sides of the ornament to unravel and straighten it out.
- Thread your string or lace through the metal top of the ornament, then carefully replace the metal top back onto the glass ornament. Pull your string or lace so that your photo hangs in the middle of your ornament and tie into a bow at the top to secure it.
- Hang your ornament and enjoy!!
Crossing my fingers that the bubble wrap, tape, and super strong box are enough to have them arrive in one piece. I hope my little ornaments bring a bit of my happiness to them :).


Woo hoo! Congrats on all the features you've been getting, that's WONDERFUL! :D
ReplyDeleteGorgeous ornaments Amanda. :)
ReplyDeleteCongrats on all your features and interviews, great news!!!
Vivienne x
oh my vintage soul sister-- just when i think i couldn't possibly love you more! <3 the loveliest surprise came to me when i needed it most. IT IS GORGEOUS! and magical and the perfect gift <3 amanda it is BEAUTIFUL! and touched both of our hearts. It's hanging up on my christmas tree right now in the middle and of course i already snapped some shots of it to share and show off ;) i have to brag about my crafty friend who has a big heart.
ReplyDeleteTHANK YOU x10 with all my heart.
i am so happy good things are coming your way-- as they should! Cheers to you dear friend.
xoxoxoxoxoxoxo <3!!!
Congratulations you deserve all that is good. I love your ornaments.
ReplyDelete