Thursday, July 28, 2011

Itchin Stitchin Cottage Kitchen - Block 2

Block #2 of the Doodle Embroidery Block Quilt is a cottage kitchen. Inspired by Eileen, who left a comment about how much she loved my kitchen. She got me thinking how lovely it would be for everyone to stitch their own dream kitchen. Doodling away this was the cute little cottage kitchen I dreamed up.
This time the lines of the doodles did come out a bit darker. If  you are planning on stitching in a lighter color, like myself, I would recommend 4 strands or more of floss. I only used 2 and the lines are showing a bit. The printed blocks haven't arrived yet but once they do they will be available in my shop to purchase.
This block has tons of little details. It's taking me a little longer to stitch up than the first block but it's also fun deciding the stitches and what colors to use. The fridge is blank but could always use a cute kids drawing. No plain pot holders for me, so I think I'll stitch them with a pattern. The window outside needs a season...as you can see there are so many fun decisions to make.
I wish Aries was a bit older, not that I am rushing anything, but I really think this would be a great starter embroidery project. Her kitchen would more than likely be filled with pinks and she would need to stitch a little cupcake on the counter. That girl loves her sweets!
My block is going to be a little different than the one I envision she would make. Once it is all stitched up I will share it in it's completeness. If you decide to stitch one up I hope you'll share yours too ... after all that's part of the fun.

Wednesday, July 27, 2011

Whatcha Working On Wednesday

So today I thought I was going to show everyone the wonders of block number 2 in the series of Doodle Embroidery Quilt Blocks but it just so happened that a little thunderstorm rolled through last night. Which in turn caused our power to go out. A viscous cycle had begun because without electricity meant not enough light to embroider and no movie to entertain children. So the kids and I played with my camera for a bit ... after all, this weeks photography inspiration is Dive In and I hadn't even started it yet.
Damien agreed that the best thing to dive in to is our bed after a long day. Of course to get the pictures the only diving in would be on mom and dad's bed. After the jumping up and down, throwing of pillows, and  taking the sheets off my bed stopped the daylight was fading fast. Getting all nestled into their own beds I read the kids a book by candle light, something that put my old eyes to the test. The fear of not having a night light was soon replaced with the rhythmic sounds of small snores and I was left to sit downstairs in silence.
A person can only watch candles flicker for so long. Paper and pen in hand I wrote down to do lists, 4 year plans, and back to school needs.Getting very bored with myself I decided to call it a night. At 2 am our power came back on with a hum. Going around the house shutting off the lights that had been left on 8 hours earlier, I realized how thankful I am for electricity. Tonight, hopefully with the power of electricity, I will be able to stitch up enough of  block 2 to post pictures. Which only leaves me with one question .. whatcha been working on?

Monday, July 25, 2011

First Job

One great thing about a heat wave is that the flowers think they are in a greenhouse. Even though my little garden has been very neglected daisies, bachelor buttons, and snap dragons still seem to be doing fine.
My first job ever was working in a greenhouse. After deciding that I didn't want to go to my local high school with the same people I had known since Kindergarten, I applied to go to an agriculture based school. Not only did my bus arrive at 4 am but you were also required to have an agriculture based project after school.
The greenhouse was my project. Covered in potting soil, soggy socks, and prune fingers were an every day occurrence. There were some things I didn't enjoy about this job like the butterflies that would get trapped inside or the snakes that would sneak up on you while you were watering the ferns, but by far, the good out weighed the bad. Cutting the lavender, smelling the flowers in blooms, and seeing every shade of nature imaginable.
It was at this job that I learnt a teaspoon of sugar, 1/2 teaspoon of baking soda, and just a pinch of salt in a vase of fresh cut flowers will make them last longer. That you want to cut your flowers at a 90 degree angle right above new leaves and that cutting flowers off your plants will make it bloom bigger and better next year. So if you pass by a garden that needs a good weeding and see some strange woman cutting the very little flowers she has to put in vases... you probably just drove by my house.

Friday, July 22, 2011

5 Years

To My Darling Husband,
    After 10 years of being together and 5 years of marriage ......
you still make me smile and laugh like this everyday. Happy 5th Anniversary!!!

Thursday, July 21, 2011

Weekly Photography Inspiration ~ Week 3

This weeks photography inspiration theme is color. Going with the theme, I went a little outside the box. Normally in my crafting work there is tons of different colors but for the photos I thought maybe I will just concentrate on how colors feel.

Like blue to me is classic, charming, farm house sophisticated, like the blue glass of mason jars.
Yellow to me is a happy color which reminds me of the center of daisies and peanut butter cookies.
Red feels powerful, demanding attention,  like the wattle of the rooster in charge.
My favorite color is green which is, peaceful, relaxing, quiet, and calm. Reminding me of my metal jade garden chairs and a field of grass blowing in the wind.
Orange is a little crazy, exciting, striking, vibrant like that of waddling duck feet.
Now white can be argued that it's not a color at all but when I think of white it's luxurious and soft like feathers.
 I also took some fun black and white photos - kinda forgetting about the theme. Thinking I may turn some into postcards for the shop. So if you were taking pictures for the weekly photo inspiration of color what color would you choose? How does that color make you feel? What would that picture be of?
P.S. I know I missed week 2 which was materials - just couldn't get inspired that week

Wednesday, July 20, 2011

Time for A Giveaway!!

Normally I have a reason for a giveaway but today is a just because kind of day. Remember that lovely bag that was part of the Summer Bloom Bucket Bag Tutorial? Well that is what you can win!!!


It features a big wide strap, applique embroidered fabric flowers, and a lined interior with pocket. Use it for the trips to the local farmer's market, as a gift, as a blog giveaway for your blog, or use it as your everyday bag.

So here is what you have to do to enter:

Leave a comment on this post telling me ~  How you would use the bag if you win. 

For extra entries (please leave 1 comment for each entry):
1. Follow my blog with Google Friend Connect/ Bloglovin or if you already do ~ leave a comment
2. Tweet about this giveaway - make sure to include @itchinstitchin ~ leave a comment
Example tweet you can use: @ItchinStitchin is having a #giveaway!! Go to http://www.itchinstitchin.blogspot.com for a chance to win a beautiful #Summer Bloom Bucket #Bag
3. Facebook about this giveaway - make sure to include @itchinstitchin ~ leave a comment
4. Pin this post on Pinterest with comment including ItchinStitchin ~ leave a comment 
5. Heart ItchinStitchin shop on Etsy ~ leave a comment


Contest ends August 6th 2011 12 pm EST. Winner will be chosen using a random number generator. This giveaway is open worldwide. Please remember to leave a way for me to contact you. You will have 72 hours to claim your prize before another winner will be chosen.

Monday, July 18, 2011

After 8 Years


Do you see something different about the boys room?

After more than 8 years we say goodbye to a piece of furniture that has been with us before our first was born. Odyn has a big boy bed and the crib is getting put in our upcoming tag sale. Hubby shed a tear and I gave a silent clap, there are no more babies in this house.

Thursday, July 14, 2011

Summer Bloom Bucket Bag Tutorial

It's here ... it's finally here!!! After a little delay of 3 children, a dog named Buster, a heat wave, and a file conversion to PDF that didn't want to show my pictures, it's finally here. If this wasn't a test to my patience I don't know what was.

bag
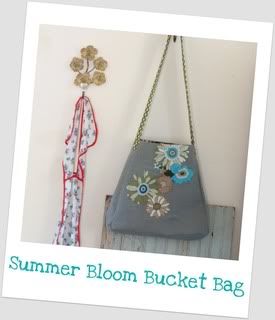
(Click on picture to find out how to make it)

It did turn out lovely though, didn't it? If you have any questions regarding the tutorial - like What the heck does that mean? -those kind of questions feel free to email me at itchinstitchin(at)gmail(dot)com. I will do my best answering anything that comes my way - and if needed I will take more step by step pictures.


The instructions tell you how to make the bag's structure but not the design on front. So here is how I did the applique on the front of my bag.
What you will need:

  • Heat Bond or any other brand of iron on stabilizer
  • Fabric with design you want to cut out
  • Embroidery floss in matching colors
  • Crewel or Embroidery needle
  • Iron
  • Scissors
  1. Iron your fabric smooth - no wrinkles at all on either side. 
  2. Cut out enough of the Heat Bond to cover the design on the fabric you want to cut out. Iron this onto the wrong side of the fabric design - leaving the paper side of the Heat Bond on. 
  3. Once stabilizer is attached to the fabric and cool enough to handle, get out your scissors and carefully cut out the design. 
  4. Carefully pull off paper backing of the Heat Bond and position the design where you would like it to lay. Remember to keep in mind the seam allowances.
  5. Once positioned where you want it press with a hot iron - starting in the middle of the design working out. This prevents fabric wrinkles and air bubbles. I also like to flip over the fabric and press from the back as well.
  6. Now your design should be secure enough onto your fabric to embroider. You can get as fancy as you want stringing beads, buttons, sequins, or other objects to embellish the design. I kept mine simple and embroidered around the petals of the flowers. Remember to secure the edges of the applique all the way around the design. This helps keep the design to the fabric and from fraying, even if it needs to be washed.


This bag would also make a great sleepover bag for the kids - you could even applique their name on it with the same method as above. Just print out large font that you like, cut out the letters, and then use the letters as a stencil onto the heat bond paper (just remember to flip the letters before you trace them or when you cut them out they will be backwards). 


The possibilities with the bag are endless and that's why I wanted to keep just the structure of the bag in the tutorial. If you do make a bag please share it on the Itchin' Stitchin' Flickr Group. I would love to see how everyone else's bags come out. 


If you are wondering what I will be doing with the lovely bag in the tutorial pictures or maybe about that floral fabric... well keep your eyes peeled on my blog, you might just see them in an upcoming giveaway .. right here!!!

Tuesday, July 12, 2011

Too Hot To Think

Thank you all for your birthday wishes! It was a great day. Lately it's been too hot to think about anything. I cleaned out the studio, because it got to a point where the projects were escaping and leaving to other rooms.
With the heat sticking around, plans that we had for this weekend soon became plans to sit by the A/C. Even though the studio was clean, not much sewing was done. Getting the bag tutorial out I started to sew only to find drops of sweat on my forehead. Exasperated by the heat I gave up and giving up is something that is very rare for me. The weatherman says that a cold front is suppose to move in and thunderstorms will happen tonight. With fingers crossed I hope he is right, so I can finish the long awaited bag.
While I was in the studio I did notice that my inspiration board was a bit lacking. Getting on the move to remedy that problem right away I searched for postcard swaps. Have you heard of Swap-bot? It's a really neat site that hosts all kinds of swaps. Soon my board will be filled with all kinds of fun postcards.
Hope for rain and stay cool - I may drag the sewing machine out of the studio and in front of the air conditioner tonight!

Saturday, July 9, 2011

Today I ~


:: Drank a Starbucks yummy Java Chip Frappuccino and enjoyed every moment of it

:: Slept in and the kids let me

:: Donated 14 inches of my hair to Locks of Love - my 5th time donating and every time it feels so great

:: Got the most Facebook messages on my wall ever

:: Took 42 pictures of myself and my new hair - liked only 2 of them

:: Shockingly finished reading my 3rd book in 2 weeks

:: Ate ice cream cake which turned my tongue blue

:: Turned 29


Thursday, July 7, 2011

Still Going

Feeling a bit under the weather lately I haven't gotten as much done as I hoped for this week. With the thought of having to renew my drivers license (YUCK) I'm afraid the sickness is just me getting another year older. Saturday will be my last birthday celebrating my 20's. Although I can't deny that my throat has been scratchy, my   stomach has been sour, and my head has been pounding. So I called in my own prescription, which  includes, sleeping a little more and doing a little less.
There has been some progress with the bag tutorial. I'm keeping the bag design simple but will give ways for you to mix it up a bit. I've promised myself to not start anything new until this is finish. Although I am moving at a snails pace lately, I'm still going.

Tuesday, July 5, 2011

Weekly Photography Inspiration ~ Week 1

I love joining Flickr groups and looking at other peoples photos almost as much as taking my own. Photography is something I want to get better at. Taking a class at this moment is not in the cards, but that has never stopped me from learning something new.
Less than a year ago I could not crochet, not even a stitch. Watching videos on the internet, reading a book, and asking a family friend for some quick lessons - I can now call myself a crocheter. Not just any crocheter either, one that has made crochet hangers, blankets, and even a little girls dress.
The way I look at things, is if you want to do something bad enough you will learn how. Looking at Flickr I found a weekly photography inspiration group that just started. To my surprise, week 1 is what you eat. Having grabbed my camera the other day while the kids and I were preparing dinner I snapped shots of lettuce from my mom's garden and the noodle that wanted to stand out in the crowd. Perfect photos without even knowing the theme for week 1 and a sign that I'm on the right path of learning something new.

Sunday, July 3, 2011

Documenting Summer

Please stop by Grace's blog where I did a guest post on how to document summer with photos.
To everyone here in the states Happy 4th!